Butterfly and Condor
By: TradeWins Publishing Editors
The Option Butterfly and Condor positions can be good strategies to use when the trader feels that the market may move near a specific target price or price range at option expiration. These trades can be used as directional positions, looking for the market to move higher or lower, but they can also be structured to take advantage of a market that is just expected to stay near the starting price.
The Option Butterfly and Condor are known as “wingspreads” in the language of options. They involve the combination of a vertical debit spread with a vertical credit spread, using all call options or all puts. For a long position, the trader is buying the outer strikes (the “wings”), and selling the middle strikes (the “body”). For these positions, there is no additional margin above the entry cost, since that is the maximum risk.
In the Butterfly position, three option strikes are used, with the middle options at the same strike, a trade that has its maximum profit potential at a single market price.
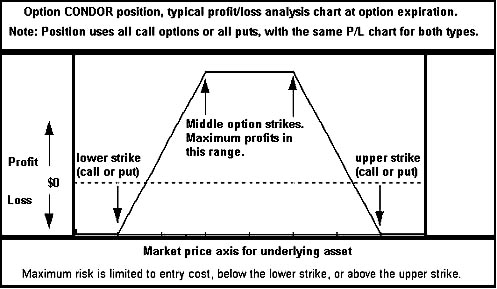
The Condor position uses four option strikes, with the middle options spread apart, creating a price range in which the trade can reach maximum profit potential. Some traders will use other names for Condors that have the middle strikes more than one strike apart, but the trade structure is the same.
NOTE: The Butterfly and Condor can also use both calls and puts, and in these cases are known as an “Iron Butterfly”, or “Iron Condor”. For long positions in these trades, they are essentially dual vertical credit spreads on both sides of the market. For example, the Iron Butterfly would involve selling an option straddle (a call and put of the same strike) near the market, and buying an option strangle (a call and put with different strikes) outside of the straddle strikes.
Consider a typical scenario where a trader might want to use a Condor position with call options. Let’s say the market outlook indicates that the market will move up into a target range above the current market price. In this case, you’d buy a vertical bull call spread that you think has a good chance of being filled at option expiration, and then help offset that cost by selling a higher vertical call spread that is unlikely to have value at expiration.
In a normal Condor, the size of the vertical debit spread and the credit spread are the same, creating a trade that would reach its maximum profit potential between the two middle strikes (the top of the debit spread and the bottom of the credit spread). The maximum loss is limited to the original entry cost, and would be reached if the market were below the lowest strike or above the highest strike at option expiration.
An Example of a Condor in Gold Call Options: Let’s say that Gold is trading near $375, in an established uptrend. The option trader thinks that the market might be near or above 400 in about 3 months, but not much higher, with significant technical resistance above the 400 area. A call Condor position could be considered. At 3 months from expiration, a 380-400 bull call spread (long the 380 call, short the 400 call) might sell for about 600. At the same time, the 410-430 spread might be selling for about 300, and if the trader shorts that spread, this would bring back a credit, reducing the total trade cost to a net of about $300. So, the total position cost (and maximum risk) is about $300, and the trade would reach a maximum value of $2,000 if the Gold market were between 400 and 410 at option expiration, the expected target range. By using the Condor, the leverage on the initial capital has been about doubled (versus just using the bull call spread). In both cases, the maximum risk is the initial cost.
Chart example: Profit/loss analysis for typical Condor position at option expiration.
Note: A Butterfly position has a similar chart, except that since the middle option strikes are the same, there is a peak in the center, at a specific market price.